
Using iPhoto to Easily Reduce Your Large Sized Digital Photos
Jan 12th, 2009 by David Balogh in Music, Photography, and Video

Photo courtesy of Rudolf_Schuba
Each year digital camera technology improves giving us larger and more defined pictures for less money. This is wonderful and I wholly encourage everyone to take pictures at the highest resolution setting they can. However, when it’s time to email these pictures, post them on a website, create a sildeshow or include them in a PowerPoint presentation, they are way to big to be useful. I will show you how to easily reduce the size of your pictures in large batches using iPhoto.
Why are should digital photographs be so large?
Digital photographs are measured in pixel size. As the resolution increases, so does the pixel size. This is a good thing because the higher the resolution and the higher the pixel count, the better the quality of your photos when they are printed. Ever enlarge a tiny picture that you found on the internet, only to find it blocky and pixellated after enlarging it? That’s why you want the highest quality picture taken from your camera.
Remember, you can always reduce the size without worry but enlarging might sacrifice quality. So make sure your nice digital camera has a huge memory card in it and snap away at the highest setting.
What problems do large digital photographs cause?
Large digital photographs have two characteristics that you must be aware of:
1. Large pixel count (actual size/area).
2. Large file size.
A photograph with a large area or size will just be too big for use without resizing. For example, on a web page you don’t want the picture taking up the entire screen. The same goes for creating layouts in a presentation. You will want to fit the photo into your design, rather than designing around it. Resizing will fix this for you.
The large file size of high resolution pictures is going to really cause problems with emails, websites and presentations. A monstrously large picture (3-5mb) is not going to be quick to display on a website.
Large file size photos may also fill up space limits within email accounts, both yours and/or the receiver’s. Some email gateways won’t deliver messages over a certain file size as well. Sending 5-10 large photos might trigger this limit. Also, emails with gigantic pictures attached will take a while for you to upload and for the receiver to download. Its good email etiquette to reduce the size of attached photographs before sending them.
In a PowerPoint presentation loaded with large pictures, your computer may struggle to handle them. PowerPoint problems related to large photos can be any of the following:
- Slow loading slides.
- Stuttering or jerky movements of animations.
- Skipping or stopping of background music.
- The spinning beach ball during your presentation.
- System instability or crashing.
Any or all of these problems, you definitely do not want to happen in front of a crowd.
To solve these problems, you don’t have to sacrifice your pictures by taking them at low settings. Just resize your photographs for within iPhoto. It’s quite easy, here’s all you need to do:
Resizing pictures in iPhoto:
Most likely if you have OS X, you are already using iPhoto to manage your digital pictures. If you aren’t, just open iPhoto and import the pictures you would like to resize. Once you have the photos in iPhoto, create a new album and put all the pictures we want to resize into this album.
- Open iPhoto and click on the plus sign at the bottom left.
- Create a new album and name it whatever you like.
- Click on the Photos tab toward the top to show all your pictures.
- Click on the photo you would like to resize and drag it into the new album.
Note: You can select multiple individual photos by holding the Command Key while clicking on the pictures.
- Click on the File Menu Bar option in iPhoto and Choose Export.
- In the Export Window, select File Export from the top.
- Select JPEG from the drop-down menu and change the size.
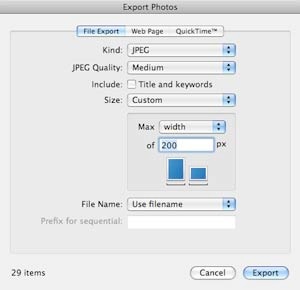
Note: For this example, I used custom size and chose to keep them all the same width of 200 pixels. For ease of use, you can choose the small, medium or large sizes if you prefer. Use small for web sites/emails and larger pictures for presentations and slideshows.
- Click Export and select a destination.
iPhoto will now resize all your photographs and place them in your specified destination. You are now free to email your pictures, post them to the web, use them in slideshows and presentations without worrying that they will be way to large to be useful. I encourage you to practice with different sizes so you can get a feel for what sizing is appropriate for an email, presentation or website image. Once you export the photos, the originals are still intact so feel free to experiment.
-
1Share:
-
5Digg
-
13Facebook
-
14Related Articles:
-
17The Open Source World’s Answer to Photoshop – The Simplest way to Install the GIMP on OS X
-
18Eliminate Printed Picture Clipping by Resizing your Photos


-
1.

-
2.Emily says:
April 28, 2009 at 8:47 pm
This is fantastic. Thank you so much for the step by step. What is the appropriate size to use for photos that will also be printed? I believe the dpi should be 300 but what about the pixel size using the custom option? Which file size (small medium large)? -
3.

-
4.David Balogh says:
April 29, 2009 at 5:10 pm
Hi Emily,
For printing digital photos, the largest file size is the best. Keep your original photograph for this purpose.
If you’re going to be printing the photos, have a look at another article I wrote about resizing photos for printing.
Good Luck,
David -
5.

-
6.Xanthe says:
May 6, 2009 at 9:44 am
Hi David,
Thanks for this most helpful step by step guide to resizing photos in iphoto. I need to resiz a batch to post on ebay so I can choose the pixel size I require and hey presto all resized for me. Great.
Xanthe -
7.

-
8.Steve Bloch says:
May 22, 2009 at 9:56 am
THANK YOU for this helpful and easy-to-understand information. I just bought a digital photo frame as a gift for my wife, but quickly filled it because I didn’t understand about making the photos smaller. With the information you’ve provided I’m going to re-do the process. -
9.

-
10.Karin Neumann_Murphy says:
June 28, 2009 at 7:23 pm
Hi David
I use images daily and your article was useful, but i am still struggling. The emails need to show images (of paintings and signatures) in detail and the small sizes you recommend pixillate when enlarged.
When exporting image files from iphoto I do not see a ppi option in the dropdown lists, only quality choices (large medium small) and dimensions expressed in pixel nr (of height and width) . What am I missing? When I then open the exported image file info it shows me it was saved at 72 ppi.
My questions:
Where can I find 300 ppi save option via iphoto export?
To make details clear do I have to send the large original file?
This creates some headaches! Can you help?
Karin -
11.

-
12.David Balogh says:
July 1, 2009 at 11:02 am
Hi Karin,
I tested out some exports of my own, watching the pixels per inch (ppi) and it looks like iPhoto doesn’t change them from the original. I tried it with both large and small exports. I imported my photo by just dragging / dropping it into iPhoto.
I would check your originals to make sure they are set to 300 DPI. That would make for the best quality. Your camera should have a setting for this, look for words like High Quality / Largest size.
As far as changing the DPI (also known as PPI) after the fact, I’d recommend Photoshop Elements or Graphic Converter. Both aren’t free but they are much more reasonably priced than the full blown Adobe CS, which will also do it.
You may also get away with just sending a larger version of the picture. If it’s to be printed, send the original.
Good luck,
David -
13.

-
14.Todd says:
July 26, 2009 at 9:22 pm
I’ve tried exporting photos as described into a new library in iPhoto. The exported photos are viewable in a Finder window (Pictures folder), but when I try to open this new library (alt+click on iPhoto, choose library) the filenames are all disabled (light grey) and the library won’t open. Please help. I’m trying to batch reduce a bunch of images for a powerpoint presentation. Thanks!