
Posted 04/21/2010 at 4:52:51pm | by Cory Bohon
A guest network is smart thinking--it's like letting someone into your house but making sure they can't rifle through your desk drawers.
368
diggs
digg
Difficulty Level: Easy
What You Need:
>> A router (either AirPort Extreme 2009 or another dual-band brand)
>> Extra Ethernet cabling (if not using a dual-band wireless router)
>> An existing wireless or wired network
Increasingly, we depend on internet access to run our lives, and when we have guests over to our house, apartment, or workplace, normally we either have to open our wireless network or give the guest our network password. Either way, you open up your wireless network to security risks.
No worries--we’ll show you how to easily setup your own guest network using either an AirPort Extreme (early 2009 model) or another brand of router (we’ll use a Netgear). On newer routers that have two antennas and therefore support dual bands, the tools needed to create a guest network usually already exist in the provided software. However, you’ll need to check your particular router to see if this type of functionality is provided.
AirPort Extreme Base Station
1. Get Manual
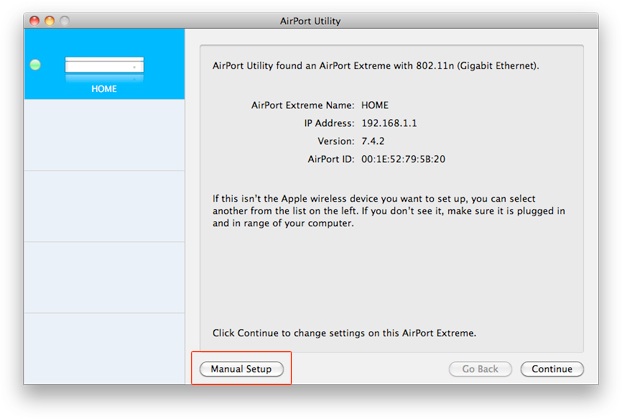
Clicking Manual Setup lets you manually manage your AirPort Extreme.
On your Mac, navigate to and open the AirPort Utility, an application used to manage your base station, found in /Applications/Utilities. Click the Manual Setup button and enter your management password.
2. Roll Out the Welcome Mat
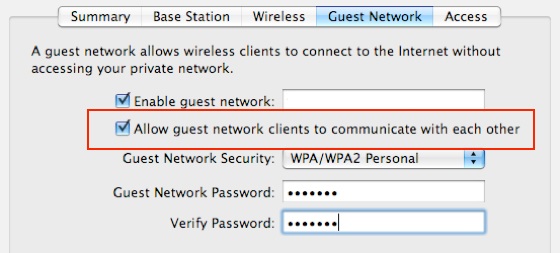
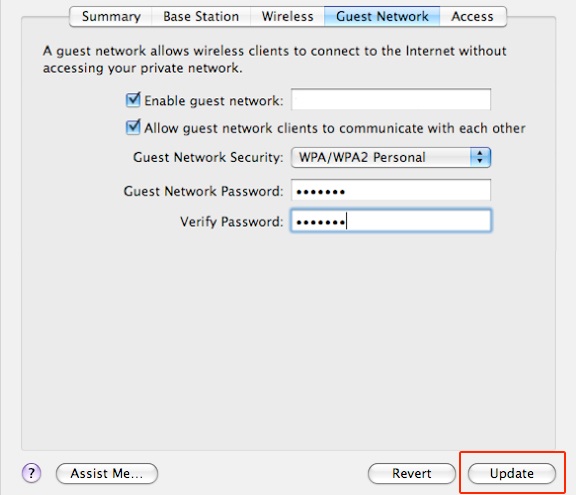
Want to let your guests' Macs talk to each other? It's more social that way.
Click the AirPort tab, and then the Guest Network tab. In this area, you’ll be able to configure your AirPort for guest access. Check the Enable Guest Network checkbox and type in an identifiable name for your guest network. Computers connecting to it will not have any access to your personal network and won’t be able to communicate with each other. However, if you check the box that says “Allow guest network clients to communicate with each other,” guests will be able to exchange files with and otherwise connect to one another.
3. Secure It
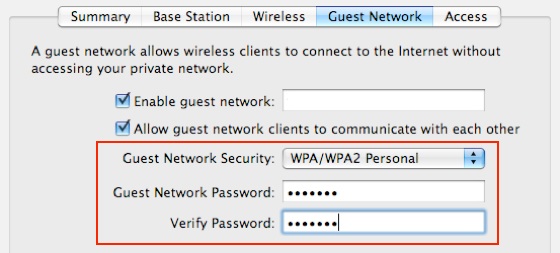
When encrypting your wireless network, we recommend using WPA encryption, because it’s more secure and less vulnerable to attacks.
In the Guest Network Security dropdown, you can select between different types of encryption. When you do this, you will be able to enter a password for your guest network. Don’t use the same password as you do for your main network, obviously, or this whole exercise will have been pointless.
4. Start It Up
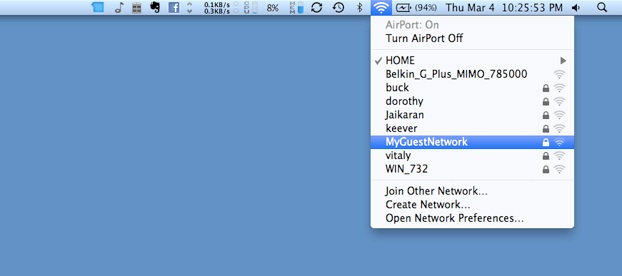
After a short restart, guests will be able to connect to the wireless network that you just created.
Once you’ve entered all of the required fields, you can click Update. After your AirPort Extreme restarts, you should see an additional wireless network appear with the name you specified in Step 2. Guests can now log in to that network using the password you chose in Step 3 and access the internet. Again, guests won’t have access to your personal network and shared resources (network printers, disks, and so on).
NetGear Router
1. Open the Control Panel

After you have set up your network, you really gotta change your router's default password for security.
While connected to your Netgear dual-band wireless router, open your web browser and navigate to routerlogin.net (or http://192.168.0.1). You’ll be prompted for your username and password. By default, your username is “admin” and your password is “password.” Yup, not so tricky.
2. Decide What Guests Can Do

If you uncheck Enable SSID Broadcast, people will not be able to "see" the network on a regular Wi-Fi scan and will have to manually type the SSID.
Once logged in, select Guest Network from the list of options on the left. You’ll be presented with many options for configuring your guest network. By checking Enable Guest Network and specifying an SSID, you can be up and running in no time. However, you can also allow or disallow access to your local network by checking or unchecking the option for Allow Guest To Access My Local Network.
3. Security Blanket

Nice and secure.
Under the Security Options, you can choose from a plethora of security algorithms, including WEP and WPA2, and you can then specify your passphrase. This is the password you’ll give to guests, so don’t use the same password as you use to secure your router’s settings (Step 1) or the password you use on your own Wi-Fi network.
4. Voilà!
Looky there... a guest network that you created, and if you're using WPA2, it's pretty secure too.
After you type in your information and click Apply, your router will restart. Your guest network will then be created, and you’ll be able to view it from the wireless menu on your Mac or PC. Your guests will be able to get online without you having to give up your main network’s password, and they won’t be able to access your network’s computers or other equipment.
What if My Router Isn't a Dual-Band?
As you can see, getting a guest network up and running is easy if you have a router that supports dual bands. If not, you can do this with virtually any spare router that you connect to your existing wired or wireless network for this purpose.

Apple's AirPort Extreme Base Station is an investment at $179, but it'll last a good long while, and it's incredibly easy to administer from a Mac.
Refer to your specific router’s documentation for port blocking to block all ports except port 80 (used for accessing HTTP content) and port 443 (used for accessing HTTPS content). This will limit that router’s internet access to only web traffic. You can then unblock additional ports as necessary for different services, such as POP (110) or IMAP (143), which will allow email. Commonly used port numbers can be found at support.apple.com/kb/TS1629. By blocking/unblocking these port numbers, you’re restricting/allowing access to the people that connect to the guest network.
Port blocking is easy to do, but just the name may scare some. If you are in the market for a new router and wish to have guest networking without a mess of cabling or having to deal with blocking and opening ports, you may want to consider getting a dual-band router. Some can be pricy, but the AirPort Extreme ($179, apple.com) and Netgear routers (netgear.com) usually last a long time.
Wireless Security: Which Should I Choose?
When putting together a wireless network, the most important piece of the puzzle is the wireless security. Unless you live in an extremely remote area, you need to enable some type of encryption. Most modern routers come with at least two types of encryption: WEP and WPA. While both do a good job, they were not created equal.
WEP (Wired Equivalent Privacy) was one of the first styles of wireless encryption brought about and is inherently insecure--several tools are available online that allow anyone to hack into a WEP-encrypted Wi-Fi network.
WPA (Wi-Fi Protected Access) is a more modern and more secure way of encrypting your wireless network. A newer standard of WPA, called WPA2, increases the security by adding additional behind-the-scenes features. WPA also has the advantage of letting you specify your own passphrase instead of using hard-to-remember hexadecimal values. So yes, use WPA2 whenever possible.